Relics and Artifacts
I am beyond thrilled to be a Guest Blogger for Relics and Artifacts. I have been a longtime fan of Sandra’s resin blanks and now her fabulous Cassiopeia’s Throne wood blanks. I love the creative possibilities and the quality of her products. Make sure to check out the Relics and Artifacts Muse Blog.
Throne Inspirations
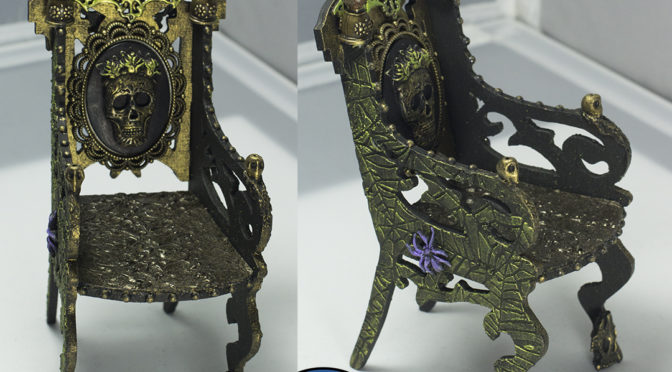
When I saw the Throne I became totally inspired. I started thinking of all those famous thrones/chairs out there and the first thing that came to mind was the Game of Thrones. I love the haunting gothic feel of the that throne and wanted to create a throne that would lend itself to the show.
Starting the Project
I started by priming the chair with black gesso. I then glued on the little pieces you see like the skulls, gargoyles, filigree at the back of the throne and the little studs on the thrones arms and seat. I used tiny flat back pearls to do that. I should say the focal skull was glued last. I then used black gesso to touch up everything I glued to the chair. I then dry brushed Liquitex Antique gold to create the aged look of the chair back, all small pieces and rivets.
Seat Cushion
I took the cushion (before starting any of this) and drew a template of the seat on heavy weight cardstock. I then used an amazing ultra thick embossing powder called Charred Gold made by Emerald Creek. I love the antique look of this gold and how it has black bits amping up the ancient feel. I used embossing ink to set the powder then a heat gun to melt it down.
I kept a rubber stamp at the ready that had been pre-inked with embossing ink to impress on to the second layer of powder I heated up. The embossing ink allows the rubber to release from the heated material. You have to be quick and precise once you move the heat gun away because things cool down fast.
If you’ve never Impressed into heated embossing powder you should really practice first with a deeply etched rubber stamp you don’t care if it gets ruined – especially for the timing. Press the rubber stamp (never a clear stamp) for about 15-30 seconds into the heated powder very carefully, then remove the rubber stamp – be careful NOT to burn yourself. Then, when totally cool, glue on to the seat blank. What you see is the result below:

Wrapping up the project
I then used modeling paste and a tiny spider web stencil to create the sides of the chair. After the paste has dried I used the black gesso to lightly paint over the web. Do not use tons of gesso/paint or you will lose the groves/indents you painfully created with the web stencil. The black adds to the dramatic finish when I applied Viva Décor Inka gold by dry brushing to create that glowing green hue. What you see below is the result:

Thanks!
Well I hope you enjoyed reading about this as much as I had creating it. So what are you waiting for? Go purchase a throne and have some fun!!!
Thanks again to the team at Relics and Artifacts for this opportunity.
Susana Magenheimer AKA
Random Artist 222
http://www.instagram.com/randomartist222
Products I used:
- Relics and Artifacts – Cassiopeia’s Throne
- Emerald Creek – Charred Gold Embossing powder
- Crafters Workshop – Black gesso
- Alpha Stamps – for most of the loose metal pieces
- Viva Décor Inka Gold
Wow, that looks awesome!! 😀
Thanks sooooo much 🙂
This is just genius. I wish I had a life size one to sit in! With a crown of course.
Thanks for the love 🙂